Ok! Many of you were interested in learning how to make this FUN Glitter Pumpkin Topiary for Halloween! This was one of the easier crafts that I've done and it was super fun!
Supplies you need:
- 3 foam pumpkins (I got mine at Michaels on sale)
- A flower pot (I had to buy two pots a smaller one 13" and a bigger one 16" got at smiths market place on sale)
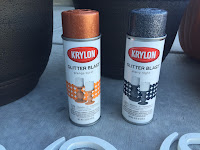
- Glitter spray paint! (Orange burst and Starry night also got at Michaels)
- BOO wood letters (Got these at Michaels as well!)
- this is an optional thing... But I painted the BOO black and orange with paints I had at home already!
- Hot glue gun

So, I first started by Spray Painting the "B" and one "O" Black and the second "O" orange. The spray paint wasn't working very well on the wood letters so I decided to paint them then re-spray them with the glitter spray paint!
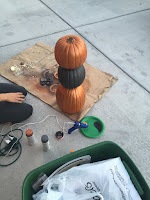
While the spray paint was drying on the letters I spray painted each of the pumpkins. One was black the other two were Orange!
 |
| The Orange ones do have glitter kind of hard to see in this picture! |
By the time I was done spraying the pumpkins, the letters that I had originally spray painted were dry. So, I painted over the glitter to get the colors that I wanted!
While everything was drying I hot glued my two pots together! The smaller one is the base part and the bigger pot was the main part where my pumpkins would sit in!
By the time I finished getting the pots situated the paint on the "BOO" letters were dried so I spray painted them with my orange blast and starry night spray paint! (I forgot to take a picture of this step but it is pretty self explanatory! :D )
I was needing a tool to cut the stems off of the bottom pumpkin and the middle pumpkin. My neighbor wasn't home while I was needing the tool (He had the piece I needed) so I improvised and it turned out really well!
I called my handy little hubby on over and had him get his drill and a screw driver out and cut the stems off that way! it was a little messy but it did what I needed it to do! (I'm sure a knife would work just as well if you don't have access to tools!)
 |
| This is what All 3 pumpkins should look like once you have taken the 2 stems off the bottom and middle pumpkin. |
I then stacked the pumpkins on top of each other by hot gluing them. You could do it by sticking a pole through all 3 pumpkins (making sure it doesn't go all the way through the top one). The only reason I didn't do the pole is because I didn't have one and I didn't want to go buy one!


Next, I placed the "BOO" letters on the pumpkins where I wanted them! I also Hot Glued these! My Hot Glue gun is a must have for me and my crafts!! So, If you don't have one go get one! :D
Now, the tricky part of the whole thing.. Trying to figure out how to get the pumpkins on TOP of the pots and NOT inside of the pot hiding! I looked around my house and found a smaller box that fit perfect inside of my pot and was high enough to keep my pumpkins up! I hot glued the pumpkins onto the box to make sure they would stay in place.
 |
| Sorry, this is the only picture I have of the box but you get the gist of how it works! |
Now, my next struggle.. trying to figure out how to hide the glue that was in-between the pumpkins and hide the box. I dug through my craft supplies found some ribbon from mine and AJ's wedding and burlap!
I tied the ribbon into bows and put one on the middle pumpkin and one on the bottom pumpkin. Then, I positioned the burlap around the bottom of the pumpkins how I wanted it and wa-la! I was finished!


No comments:
Post a Comment